- In Stock Items Will ship in 2-3 business days
- Special Order and Custom Items will be ordered/made for you and shipped when available
- More information? Contact us about this product
- Add to comparison list
Benefits of the security net:
Keeps the frame, wheels, and compression members together if the TSA (Transportation Security Administration) inspectors open the lid. Allows the contents to be removed from the case for inspection while still being held together. The see-through net allows inspectors to see what's inside without undoing the straps. The net holds components together so they are less likely to shift during transit.
Why do we offer a security net?
The primary reason for the introduction of the security net was to reduce the potential for damage to the packed bike due to improper repacking being done by TSA baggage inspectors. Since 9-11, the frequency of airline baggage being opened for security checks has dramatically increased. When the TSA inspectors open a piece of luggage, they seem to have trouble repacking it properly. With a bike, improper packing can result in costly damage. Some of our customers have reported inspections with no damage and everything seems to be put back just as it was. Others have had compression members just thrown in the bottom of the case or items improperly positioned creating a potential for damage. When the inspectors open a case, it's common for the front wheel to stay in the lid which pulls the compression members apart. Then, when the inspectors dig to the bottom of the case looking for banned items, they sometimes aren't very good at remembering where everything goes in order to close the lid without damaging something. Inspectors also have a hard time figuring out that the compression members go on after the front wheel is properly situated, then the lid is closed. Our security net keeps the contents including the compression member held tightly together so the case can not only be opened but the whole assembly can be raised to see what's on the bottom of the case or it can be completely removed from the case and turned upside down for closer inspection. Since the inspectors can easily see through the net material, it should minimize the need to take the assembly apart for inspection. We suggest that anything like a stuff sack, that might be able to conceal something, be not used or kept along an edge where it can be removed and inspected without disturbing the straps. An added benefit to the security net is that it restrains the case contents to minimize shifting which could cause damage to the components. Weight: 135 grams, 4.76 oz.
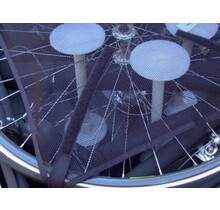
A packed bike with the security net in place. Straps and d-rings at each corner join the panels together. Avoiding the use of stuff sacks and other concealing containers may help. It's easy for TSA inspectors to lift the contents for inspection without loosening the straps. They can even remove the complete bike from the case to see the bottom side.
Steps to installing a security net:
Step 1.
Lay the bottom panel (the one with d-rings) into the bottom of the case. Nylon hook and loop straps allows the d-rings to be positioned to meet the user's preference. Adjust the d-ring position as shown here for a 10" case. Adjust the d-rings farther away from the panel for use in a 12" or 14" case.
Step 2.
Pack the bike and install the compression members as you normally would.
Step 3.
Extend the hook and loop straps on the top panel (the one without d-rings).
Step 4.
Lay the top panel over the packed bike with the strap side up.
Step 5.
Locate the d-rings in each corner.
Step 6.
Thread the straps through the d-rings at each corner as shown here.
Step 7.
Fasten each of the four straps back onto themselves. Notice that the d-ring is about centered between the top and bottom panels.
Step 8.
The compression members should be higher than any bike components when the case is closed. Notice how the net stretches slightly to conform to the compression members. Finally, close the lid as you normally would.